Two new additions to my book library

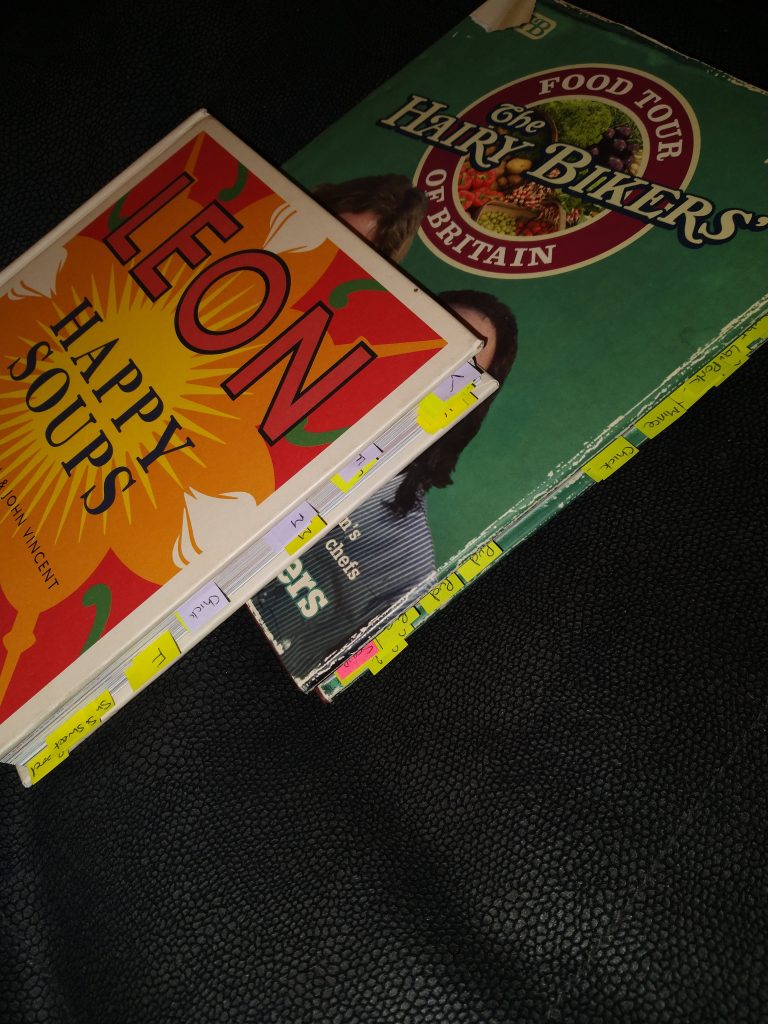
This Christmas, I was lucky to receive two new cook books but before we talk about these, a little bit about the post it slips.

It can be difficult to plan meals, especially when time is tight so one weekend I got all of my cook books out after ordering some post it tags and basically set myself a task of marking up all of the recipes that both took my interest but also were able to be made with ingredients that should be reasonably easy to get hold of. I have never really understood cook books that have ingredients that are hard to source. I know that may be lazy but my thoughts is that the average cook book is designed for people like you and me who want to enjoy cooking and learn new techniques without the barrier of looking at a recipe and realising you now have the hard work of sourcing 3 ingredients which you have never sen in any of your usual shopping haunts.

The post it notes are marked up as starters, snacks, soups, veg, fish, pork, beef, lamb, mince, sausages, pasta, bread, cakes and desserts (I think thats all of them) and basically it gives me an easy structure so when I am planning my meals (which I do once a fortnight the day before the fortnightly shop), I can get to the sections easy.

I also have another part to the system which is if I have not cooked it, the post it is on the front (vertical) edge and once it is cooked it moved to the top (horizontal) edge. This serves two purposes. Firstly when looking for new meals, I can easily access a source of ideas which I have not attempted before, but also if I am entertaining or cooking for friends and family, I can quickly get to the recipes I have tried before!

So what about the books? Well lets start with the Leon one. I already had one of their books and for those of you which had not heard of Leon, they are a London based restaurant with their roots set in very healthy food. Their website bio states “The first Leon restaurant, in London’s Carnaby Street, opened its doors in July 2004. For its founders – Henry Dimbleby, John Vincent and Allegra McEvedy – the aim was to change the face of fast food, by bringing fresh, wholesome cooking to the high street”. And to be honest, I really enjoy cooking from that book. So much that my daughter spied a book of theirs which was purely soups and knowing how much I was living on carrot or spicy parsnip (plus some random efforts when I was using up what was left in the fridge), she felt maybe a bit of structure would inspire me. Their is a very wide selection in this book and the good thing is the ingredients are easily accessible and portions can be easily adjusted if you are just cooking for one.

I had never attempted a standard Cream of Chicken before but the recipe was easy to follow and resulted in a really nice bowl of soup. Spicing it up a bit, the next one I attempted was a Chickpea, Sweet Potato and Chorizio. Once again, the recipe was based on simple to source ingredients so the chickpeas were tinned so you were not expected to soak them 2 hours beforehand and you could use chicken or veg stock from a cube if you wanted.

The section on sweet soups is something new to me and I am not sure how I feel about cardamon spiced roasted peach or chilled cherry soups but part of my journey is about pushing my tastes and experiences so I am sure I will get round to it one day.

The Hairy Bikers cookbook was a Christmas gift from my son and daughter in law this year and it takes the format of a regional tour, presenting recipes from different parts of the country. This means that the ingredients are probably more diverse and less mainstream in terms of sourcing them but on my first pass through, I was able to mark up 22 recipes. One of the great things about challenging yourself to cook from scratch is experiencing different tastes and textures as well as learning new techniques which you can then apply to other meals.

So far I have cooked twice from this book. The first was an Northern Irish dish called Boxty which is basically a savoury pancake made from a mixture of cooked mashed and grated raw potato. Cooked with crispy bacon and maple syrup it made a really simple light tea one evening. The second meal originated from Scotland (Argyll and Bute) which was goujons of fish fried in oatmeal (which is the traditional way of cooking herring according to the book). Basically a posh fish finger but really tasty!

These books form part of the bookshelf here at Glan Gors so if you are planning a stay at some time, feel free to rummage through them for inspiration.

Door fronts and right hand strip out

I am still waiting on the plumber to give me a date to disconnect the taps as they have no inline isolator valves and as I don’t trust my own skills with a plumbing system I don’t know (especially how reliable the stop cock is) I am happy to wait. In the mean time I am continuing to prep the kitchen to a stage where I can lay the new floor and start building from the ground up.

In the mean time I have been able to progress refurbishing the door and drawer fronts. As you may recall, originally I was going to replace the whole kitchen but as the main carcasses were solid and the basic layout gave me a good starting point it seemed logical to try and upcycle by changing the colour scheme.

I have never attempted this before but looking at a number of online groups, these types of things are becoming more common and it would allow me to choose a pastel colour scheme as well as learning a new skill and if it was effective, I could always change the colour scheme in later years. I wanted a duck egg blue as my base and in the end I settled for B&Q’s own brand GoodHome satin paint in a colour scheme called Melville. I had never painted with an undercoat before so had no point of reference so I just read around some reviews and ended up buying No Nonsense from Screw Fix as I had an online order being processed and just added it to the basket.

The process was actually very straight forward. Remove the doors, give them a good clean (I used a good general purpose kitchen cleaner although a lot of people use sugar soap), use the belt sander to give the surface a quick rough up then two coats of undercoat and 2 coats of top coat. I would not say the finish is perfect, in fact I have some drip lines on the edges and on a couple of doors more noticeable brush strokes but at the end of the day I am planning a rustic country kitchen where maybe a hundred years ago kitchens were refreshed with more primitive brushes so I was not striving for perfection. Maybe in a few years time I can take a couple of doors off and attempt a fresh top coat with light fine grit sanding to see if I can improve my technique but for now I am actually really happy with the result.

Handles were purchased from Screwfix and work really well

The original kitchen had long handles with double drill points but I wanted simple Beech knobs to compliment the new Beech worktops I will be buying. I managed to source some from Screwfix which work really well but I have to find a way to mask the additional drill holes. I have a few ideas which are works in progress so more on that at a later date.

Now that the door fronts are done, the carcasses are ready to have the old worktop removed once the taps are disconnected, then I can make a start on the flooring.

But even before that, I had to remove the cornet unit. The picture you can see above is the left hand side of the kitchen and the picture below is the right hand side. I wanted to lose the corner unit and put a wider range cooker in in the same location as the current cooker so the unit had to go.

Removing the old worktop made the rest of the removal nice an easy

Dismantling the unit was fairly straight forward, the hard part was as the cooker is connected to the gas I had limited wriggle room at the start but careful maneuvering left me with a nice big gap as you can see below.

My next challenge is to work out what to do with the lower door. It has not been opened since the kitchen was fitted and has shelves to the full depth. If you look at the paint line that will be in line with the new worktop level so I am thinking about splitting the door so the top section can be utilised. The wall is going to be refaced with wooden cladding and then painted in a complimentary colour scheme but I do need to assess this wall as it faces the outside of the house and as you can see, some plaster has been removed to see the general condition.

All in all I am happy with the progress the kitchen is taking and I hope its going to be a lovely feature of the house.

First venture into the garden

Whilst a bit chilly, this weekend I felt I had spent enough time on the inside of the house and to be honest, everything I currently do seems to involve deconstructing things and I think I have enough to put back together so a spell outside was probably good for me (and the house)!

Spring is coming and a blank canvass to work with

And I’m glad I did, as it was lovely just to explore the garden, start to clear back all of the dead ferns, pick up the covering of leaves and cut back a lot of overgrowth.

My plan this year is to really let the established garden come through and see what is already there, then for 2022 I can build on that. My only caveat is I want to start to establish the meadow flower garden and start to segregate the lawn into the 3 zones and get the flowers established in the mid section.

The 3 tier rockery has a lot of potential but i suspect the overhang from the tree will restrict light

I am keen to start growing my own veg again and I am wondering if an area at the top of the garden which looks like it was previously used as a fire pit could be a good site. At the moment I have just used it as a dumping ground for all of the cleared debris so another option could be for 12 months just to have it establish as an open compost heap. I have never done one of those before (having a plastic compost bin that ended up attracting rats previously) so I’m not 100% sure on that yet. I will need to read up on these a bit more I think, but it would be nice to have my own eco friendly compost heap as opposed to having a mass produced plastic one and if I can establish it in the area where the veg will be grown next year I should be able to just dig it in where it lies.

This space used as a fire pit is probably a good spot to be used for something else

One little find as I was clearing back a section was this creation. I am going to cut back a bit more next weekend and try and establish what the structure is. I am intrigued.

The last part of my planning jigsaw will be to tidy up under the tree in the centre of garden and establish this as a feature. Once again, I think the plan this year will be to see what is already established there and add some wild flowers then next year set about a more planned landscaping.

When is a crack not a crack?

One thing my Dad did instill in me was not to bodge things, well that and ALWAYS have good tyre tread depth, especially when I was driving his Grandchildren around!

Therefore when presented with a crack in the small room which on the building survey was deemed as non structural I did struggle with just patching it and painting over it as at some point it would dry out and be visible again.

But I wanted to get a first coat of paint down just to refresh the room so I thought if I open the crack up into a V and do a light fill it would suffice (but I knew it would be a bodge).

So I went armed with my trusty scraper that had already done so much damage in the last few weeks and started using the corner to delicately open up the crack into a thick V, enough to allow the filler to bond and give enough surface area to sand back.

And….. the inevitable happened, part of the crack moved and indicated a weak bond of the plaster layer and before you knew it I was opening up a bigger area.

On examining the plaster and the hole / crack a number of things were apparent:

  1. The base coat plaster layer appears to be lime based with hair
  2. The main area of compromise did not appear to have a solid backing structure to hold onto
  3. Examining the roof outside, their did not appear to be anything obvious
  4. Their was no signs of water ingress

Speaking to my neighbour, who knew the previous occupant well, he advised that the crack had been there for at least 10 years so that sort of correlated with the building survey that it was stable and historic. It could have been caused by window replacements or the building of the porch on the external wall below it and nearby.

The next step now is to look at the remediation plan !

Didnt see this coming

Friday 5th:

About 4 weeks ago, I noticed a small amount of staining on some fresh paint, and it was adjacent to a wall that had badly blown wallpaper which was quite a way down on my list as it was the upstairs hallway and the decoration of this was way off.

The last week or so the mark had been bugging me, and looking at the ceiling above the wallpaper I noticed staining on this as well. I had 30 minutes spare last night so I thought I would just grab the scraper and remove the top coat of paper to at least get a feel for the state of the plaster.

True to form this turned into a voyage of discovery as the plaster was compromised and came off easy using just the scraper and unearthed the original stone structure inner wall. This (as was the plaster) has areas which were wet and blackened with mould and it was obvious this was not a recent water ingress but has been happening for a long time. Digging upwards exposed some wooden strips, I suspect from the loft cavity was rotten so stripping back a good area and having a llok in the loft was going to be the call of the day.

Amazing what you can do with just a wallpaper scraper!

I took the opportunity to have a look at the roof and noticed that if you drew a line through the marking on the picture and the one in my bedroom behind it, it followed the valley on the roof so I suspect that the valley has become compromised allowing water into the loft and then following a fall line to this point in the wall.

I am going to pop up in the loft tomorrow to take a look at any potential damage that needs to be considered in there but I am hoping that the main fix will be just to get the valley repaired or at worse replaced and then strip the inside back, let everything dry out, monitor it for a while then make good, Its better to do it now whilst I am younger and have the capital in the budget then leave it to get worse in my ageing years!

Update: following day

Luckily I had ordered a new step ladder to get into the loft and it arrived today so I was able to pop up their safely and have a look. What a voyage of discovery to see the loft layout of an old house! Anyway the good news is that the felt looks in really good condition and chatting to my neighbour he confirmed that the previous owner had the roof stripped and re-felted although he could not remember when. He also said that the previous owner had a roofing company out to fix the same area somewhere between 3 -5 years ago so I suspect the original compromised plaster was never stripped back and the fault was not treated properly.

The key things I was looking out for was any easy visible signs of long term damage caused by water ingress, any visible light and any signs of the natural water run. Whilst I was was not able to see anything serious their was signs of what could be a natural fall line for water and it did align to the valley area so hopefully when the roofer comes out next week to inspect, assess and price it up it should be relatively good news.

Fingers crossed

The last article on the dining room was titled “Hoping for a hidden gem” as my initial suspicions was that the original fireplace was present in the dining room. I was hoping for something similar to what we have in the snug (ie a very large open inglenook) and the high ridge started to indicate this. Also in the corner of the room was an area which had very strong signs of damp which needed attention so I knew that the dining room was always going to be a significant piece of work, it was just a case of establishing where on the scale of “significant” it was.

So a couple of weeks ago when I was bored one evening, I thought I would just take a “strip” of wallpaper off near the ridge and see what I could find. If you have a look at the picture below (which my daughter says looks like an Ibiza DJ holding headphones to their ear in one hand and doing an air fist pump with the other) the thin bit at the top is the ridge line.

What can you see in the stripped wallpaper area?

The outcome was actually very disappointing as once the paper was removed, what appeared to be underneath was concrete in texture and not slate. Oh well, it was never expected so no loss but at least I know this was the lintel line so started to give me an idea of the size of the potential opening so the inglenook was still a possibility.

Anyway, wind the clock forward to today and my plan was to strip all of this wall back to the plaster so that once the fire was decommissioned I could remove the fire place and fire and start to see what I was working with. To be clear, the plan was “strip the wallpaper on this wall only….

So I started low down on both sides, especially on the right had side as there was clear signs of damp here. Paper was peeling and surface paint was bubbling. You can see from the picture below, to the right of the fireplace is a shelf as the wall recesses back and all the area below the shelf on all 3 faces needed attention, but today I was just going to strip the wallpaper on the wall around the fire place….

The recess under the shelf (in the back corner behind the right hand chair you can see) had a lot of signs of damp

The problem was, as the paper on the right hand side of the chimney breast started peeling, it naturally went around the corner, and as it went around the corner it was clear that the plaster had absorbed a lot of moisture and was compromised and once you started taking it of, well you just had to find out the extent of the problem.

The first sign that the chimney breast was natural stone

As you can see from the picture above, the layers of plaster once peeled back exposed the original stone work. I am not sure how much effort it will be to restore this back, but fortunately time is something that I have plenty of.

All 3 sides will need to be stripped back to remediate the damp

I suspect that the shelf contributed in some form to trapping moisture in the air and not allowing it to free-flow out, probably contributing to the concentration. My current plan is to move the socket up to the ceiling beams for now and get rid of the shelf. This whole area can then be stripped back and probably will be a great place to have a Christmas Tree.

So back to the main wall. Obviously, as the plaster was coming off in chunks at the side, it started to creep around the front and I suddenly got sight of something black. Was this slate? As I gently allowed the plaster to come off, the black area got taller and opening it wider it became apparent that it actually was a lintel. The next thing to find out was whether it was purely ornamental or if it was the lintel that created the framework of the inglenook.

Now remember my plan was to just strip the wallpaper but what I actually ended up with was the picture below.

I know, I have to clear it all up after!

The horizontal aspect appears to be the depth of the lintel and clearing off the mortar on the right hand side later on shows a clear connection into the upright stone pillar running vertically on the right hand side that is starting to be exposed.

The original lip that I exposed on the left hand side, thought to be a concrete lintel is actually a contoured plaster which levered off really easy to show the upper edged of the lintel supporting the upper stone work.

The next step before I go any further is to get the gas fire decommisioned so I can safely remove the current fire surround and see how much block removal is needed and the potential size of the cavity.

If you look very closely at the picture above, on the left hand side, vertically in line with the the left hand edge of the wooden fire place, you will see a small hole about 12 inches up from the mantle. This exposed the original water pipes which terminate in the cupboard to the left hand side. The old airing cupboard is above this so their is the possibility that a range type boiler existed and wouldn’t it be wonderful if it had been bricked in there and not removed?

I will let you know more once the fire is removed.

Plaster, original wallpaper, thick wallpaper over the top with multiple layers of paint. No wonder the walls could not breath!

Starting the kitchen

One obvious aspect when viewing the house was that the kitchen had to go! It was functional and all working but certainly not to my taste as it was dated in its style and the layout was not how I would have it set up. My key “want” was to separate the “cooking” from the washing up and having a good sized utility room with a sink and place for a dishwasher, I wanted to move that aspect of life out of the kitchen and only have a small sink in the kitchen for food prep etc. I also wanted a small range style cooking appliance. Ideally I would love to have gone to a solid fuel Rayburn but researching it, it would be in my case “form over function” so I put that thought to one side and moved towards a nice range style cooker. I have fitted Ikea kitchens before and my experiences in terms of ease of fit and longevity has been good. My aim was to get sparks/plumber to do all the services work and then I would fit the kitchen and new flooring around their first and second fix cycles.

So that was the plan, and the budget allowed it. Their were some fixed costs that would need to be replaced regardless of my approach (such as the flooring, worktops, sink and taps) but the replacement of the units and doors (c £650 cost) was going to be a replace old with new where the only benefit was changing the looks of the doors. Looking at keeping the carcases (as these were solid) and just replacing the doors gave me 3 options to consider which were; upcycle the existing doors, buy online replacements as they were standard size or make the doors myself from scratch. The potential cost saving was attractive and I did like the idea of trying a bit of upcycling and it seems to becoming more common place and would allow me to colour the doors in the manner that I had visualised for the kitchen as opposed to being tied to on-line options only. Worse case if it did not fit in or I found the doors not to be hard wearing, it would be straight forward to replace the base units at a later date due to the modular design I was taking.

The floor was an easy decision, it was going! It was dated lino and very worn with an unlevel base so the simple option was once the kitchen was stripped, lay a good quality latex based self levelling compound and then lay some nice ceramic tiles. I had done this in my previous house so was happy with my skill level to do this, My main decision here was to chose a style of tile that blended with the original flooring in the hallway and also to decide whether I finished it directly against the hallway flooring (which actually was past the door opening) or have a small black slate effect strip separating the two.

My next thought moved onto the wall, and I had already decided what I wanted here. Pastel coloured painted tongue and grooved panels. I know this would mean fitting all of this from scratch but would be a great skill to learn as it would encompass a lot of techniques. And from a cost viewpoint is not that expensive.

So back to the cabinet doors, and at this stage I am going to go down the upcycle route. I had two doors in a cabinet that was not going to be used based on the new layout so I could use this as a tester in terms of prep, rubbing back, undercoat binding and top coat finish and an initial test actually gave a really nice finish and even if it only lasts me 3 years, will be a new skill I have learns and saved me a bit of cash which I can redirect into some areas where the budget needed it more.

As the corner unit is going, I could use the doors as my tester

The worktops were a simple decision, in my last house I had solid wood (which I chopped directly on top of… arghhh I hear some of you shouting)! I actually had a 2 star Michelin chef who I was fortunate enough to work with help me design my last kitchen and it was he who encouraged me to allow work surfaces to become “used” in their look. Have a plastic chopping board for meat and fish but for veg prep, just spray down with an Anti Bac spray and prep straight onto the worktop. No risk of chopping board slip and endless space. That’s my plan again and with solid Beech worktops being an economical option and me being happy to cut them to size I think that is where I am going.

As the kitchen in mainly going to be used for cooking, the current sink will be removed and a small half basin put in, mainly for food prep but in order to do the flooring properly the base units with the sink will need to be removed. As the taps seem to have no in-line isolators I will probably take the opportunity to get them capped off with an isolator higher up and then once the main kitchen is removed and rebuilt I can get a more natural run of the pipes.

Finally cooking. Once I had settled on a range style cooker it was really about fuel type and size. I prefer gas over electric and the main sizes are 90, 100 and 110 cm. My original plan was to locate the cooker in the back right hand corner running against the wall that has the window but that would lose me about 1m of work surface. With the gas point in that corner my options were limited but by turning the cooker 90 deg and placing it on the wall opposite the door way (as the current one is) but losing the extended piece in the picture below that links to the left hand side, I think I can maximise the use of space and have a very functional design.

Final position will be the same but with the corner unit cut back so the cooker moves right a bit and the extension to the left will be gone

Final removal of dining room cement plinth

Saturday had a single plan and that was to get the rest of the cement up from the dining room floor and assess the damage. For those of you not following the previous chapter on this, after lifting the dining room carpet, we found the most incredible original welsh slate floor. Unfortunately where the main walkway is, it appears to have worn significantly and to create a level for the carpet, a previous owner had simply built it up with cement straight on top of the slate or so we thought!

Whilst the perimeter edges were OK to remove, the main bulk of the area had two issues. Firstly as I moved closer to the centre, the depth was getting greater and it appeared to be at least an inch and a half, maybe two inches. Secondly I had no knowledge of what was under it. It if was anything like the concaved bit, it would be solid slate and therefore applying to much force or pressure could risk cracking the stone underneath.

The tools mark out the potential area and you can clearly see the mortar base line from the mid point of the bottom running as a diagonal to the right hand edge but the lump hammer

My only option really was to gradually, using a small chisel and mid size hammer, chip away at a number of angles, removing small pieces towards the centre. At one point, putting a chisel under one edge and gradually levering up, saw the final section flex at all of the edges but as I still had slate underneath, any excessive pressure could result in cracking the original layer.

I persevered for about another 30 minutes, then a larger section came away and instead of slate underneath, I could see bare soil! It would appear that this section had been damaged down to the base layer and a section of the slate had been removed.

As it is a significant way from the walls, it was good to see the soil bed very dry

Armed with the knowledge that I now had cement on a soil bed, I could be a little bit more “assertive” and switching to a small handheld lump hammer, using basic percussion strokes (ie whacking it) I was able to break the thick concrete base into smaller fractured sections which were easily removed.

The full tile is 1220 x 600 mm and you can see the extend of the damaged area

Once the full cement area was removed a good inspection of the soil bed showed it to be dry (certainly when you look at the context of the outside ground and the amount of rain we have had). The next stage is to create a temporary wooden frame and top board to allow the rug to safely cover it, then I can look at my options. At the moment I am considering the following:

  1. Replace the whole tile with a new one sourced locally
  2. Clean back the edge in a triangle and replace only the missing area with a custom cut piece of stone (therefore retaining the original piece)
  3. Remove the whole tile and make a feature of the space that bring my “new family and life” into the room – (I am thinking a mosaic tile design)
  4. Clean back the edge in a triangle and replace only the missing area with a feature that brings my “new family and life” into the room such as an evolving cement print of my grand childrens hands and feet (I know what I mean but I cant picture it yet….)

Whatever I do has to fit in with the character of the room. It will mainly be a dining room for family gatherings and you can see from the shot below with the dining room table and light, the style I am aiming for. Once you open up the fireplace behind you can probably get a idea for the direction it is going in.

Yes the yellow will be going and the aim is to open the fireplace up with a nice log burner

One month on – learnings so far

So its been just over a month since I exchanged and picked up the keys (10th December) and almost a full month of living here on my own (moved out of the farm on 19th December). To say it has been a blast so far is an understatement and losing the previous house as a result of Japanese Knotweed and a £19,000 removal bill (long story), really meant that this place and me we meant to get together.

So I thought I would capture my initial thoughts whilst they were fresh in my mind to either help or inspire others on this journey. They are in no particular order, just a bit of a brain dump.

On of the first mindsets I set upon once in the house was to re-assess the building survey with a fresh and objective set of eyes. Even thought I was a cash purchaser and had no Building Society to assure against a loan, I wanted to go into the purchase as well informed as I could. I selected a full structural survey but had been warned by a number of people about the number of disclaimers and uses of the word “in our opinion” or “we would recommend” to basically remove any liability on themselves but at the end of the day the document gave me a basis of understanding and once in the house I was able to do a more detailed and time framed assessment of some of the key points that had been highlighted. The reason for this was two fold. Firstly the key major points highlighted, I wanted to check if they were major and if so, the prioritisation of the work may need to be changed but secondly for each item in the report I had put a task in my plan and budget so by rechecking a number of items some budget was able to be released as on checking the comments, in the cold light of day and with an on site assessment as the home owner I could make a decision on whether it was a real issue I was worried about or just an indicator on the report to be aware of. This really helped me with the next stage of my planning and also put my mind to rest on a couple of items and re-affirmed some priority work which maybe in my mind I wanted to dismiss.

I was also fortunate to some degree to move in during the winter as this allowed me to quickly take advantage of weather changes to check things and reassure myself. One item commented on the survey again was the potential of guttering being blocked and soakaways being compromised. Fortunately I have moved into an area which appears to have three types of winter weather these being “its raining hard”, “it was raining hard but is not as hard at the moment” and “its not raining at the moment but you can bet your bottom dollar it will be raining soon”. I’ve also had quite a bit of snow, not heavy/deep snow, but enough in frequency to make me grateful that I have the Land-rover. What this weather has allowed me to do though is both observe the external working of the guttering (i.e. no overflows mid way through a run) and also check that no soakaways are backing up. Also one tip I was was told once was a simple way to assess the efficiency of your loft lagging. Basically once it has snowed look outside of your house once it has stopped and compare the thaw rate on your roof compared to others nearby. If yours clears quicker, it is a likelihood that you are loosing more heat out through your loft and therefore could do with addressing the lagging. Not sure how true this test is but the theory seems to hold water. In all honesty mine was clearing a bit quicker than next doors but not at a rate which makes me think that I have an immediate issue but I suspect before next winter I will add additional insulation up there to give me some piece of mind and see if it helps at all.

My next learning was one I had not anticipated but really should have and is a piece of advice I am happy to pass on. Its a really simple one and that is don’t expect everything to work! Whilst sellers have an obligation to provide accurate information, the secret is in the detail. My seller declared on the legal forms that the central heating was working but had not been serviced in the last 12 months. During my visits to the house I had obderved the raditors on hot and also checked all of the taps and shower. So yes I had a working boiler, heating and hot water. What I did not have was a fully functioning radiator in the lounge (it has a cold spot over 1/3 of it and does not get as hot as the others which indicates not just needing bleeding but also the system needing to be balanced ) but actually the main issue was that the time clock on the system was broken, Basically it was running at 1/3 speed so for every hour that passed, the clock only moved forward 20 minutes. This meant that it was almost impossible to set a sequenced on and off time. Also the over-ride did not work! The key learning here was not so much about expecting problems, it was having the key services tee’d up in advance. My next paragraph actually leads on from this because my experience of trades (sparks, plumber, fire fitters and builders) has been chequered based on this and my strong advise would be to get in contact with a few of each trade well in advance, create a relationship so if you need to make a quick call you have an earlier contact to build upon. I was lucky that a plumber literally lived across the road and was able to do it the same day I discovered it. Did I feel like I ended up paying slightly more than I would have with a planned piece of work, yep and I could have saved myself a few quid waiting it out but it was an emergency ring around and a cold call job so that’s how it works. I suppose the point I’m making is if it had turned out to be something more urgent, I didn’t have the trades to hand and certainly if I was doing it again I would set these up during that time waiting for contracts to be exchanged etc.

So onto the trades and two main learnings here. The first thing that has surprised me is the difference in approach in urgency and contact. Someone once said to me that if a trades person is able to start straight away then avoid them and all good trades folk are busy, but there is busy and either not getting back in contact or being very slow in returning a quote for a several thousand pounds piece of work. I’ve certainly learnt to trust my gut now and am happy to contact at least 4 suppliers of each trade knowing that I will probably find 1 that replies quickly, 1 that is “what I would expect” and the other 2 basically being really poor in either their interest or quality of initial engagement service. I still try to get at least 2 quotes for every major piece of work and ideally now I feed small pieces of work in to get to know the contractor, their work quality and approach and reliability before feeding in the bigger more costly assignments . Where possible I have tried to support local businesses but do go further afield if the local trades do not meet what I think is a basic level of service expectation (even in turning around a quote).

As part of my day job, I am a project manager but buying a house is a new thing for me (the last one I bought was over 20 years ago and I had a wife and young family then)! One thing that caught me out and whilst not a big budget breaker, could catch some out if unplanned or if you have no contingency money was the little costs which quickly added up to a few hundred pounds. These were silly things like getting extra keys cut, buying a few curtain poles, a number of endless “bits and bobs” purchases from Amazon and Screwfix as little jobs popped up. All of this had to be robbed from other budget pots and if I was going to do it again, I would definitely have an unplanned pot of £500 for the first 6 months to be able to dip into as little things cropped up.

So my last learning is a light hearted way of ending this post and maybe targeted to those who could be going through a similar parallel life journey to myself. A lot of the design of my old family house was not down to me. I had never really been into the whole room design and soft furnishings thing, but starting out anew and staying in a furnished rental for 12 months prior to buying this place meant that I was actually moving in with basically my clothes, some kitchen stuff I had bought and that was about it (obviously personal items put to one side). This meant that was well as buying all the furniture (which apart from 2 beds was either second hand or gifted), I had a blank canvass on every room when it came to colours and style. What I did learn is that shopping for soft furnishings (and second hand furniture actually) is fun and actually very addictive! Now don’t get me wrong, if left to my own devices anything could have happened (I am colour blind with limited dress sense I am advised…) so I did get support and validation from my kids and their partners etc but I have found it really enjoyable creating the style of each room. What is this paragraph as a learning to share? Well there are a number of things. Firstly each room had a budget set aside for furniture, paint, flooring and soft furnishings such as curtains. From that I had a simple note book with each room having a double page and from that, everything about that room got recorded and struck through as it gone done with any little residue jobs (eg – small crack in plaster by window) scribbled down so if they did not get done immediately they were recorded. This meant when I got a delivery of 5 sets of curtains in one box, I could go straight to my book ad look up which ones were for where. I also limited my suppliers down to two or three companies who I found reasonably priced, a good range and quality and great service. That does not mean I didn’t shop around and use other companies but I found that most of my needs came from maybe 3 or 4 suppliers max and almost all of it done online.

As I said, its been just over a month since I moved out of the farm and whilst I will always have fantastic memories of my year there, it is great to get the Glan Gors project moving. I hope these early observations are useful to anyone else embarking on a similar journey.

More discoveries and a garden plan

After ripping the flooring up in the dining room last weekend, another trip to the household recycling centre was needed. Now the Land Rover (Stanley) was back from getting the brakes seen to, this weekend started with a bit of time out in the garden loading everything up. Whilst I was in my “outdoor clothes” it was a chance to open up the doors of the upper floor of the workshop and look at the facilities, asses the floor viability (as this had been pointed out on the survey) and also see what had been left behind.

I also wanted to start to visualise the garden and start to plan any spring activities that I might need to do. At present I would like to start the foundation of a traditional “wild meadow”. The garden is adjacent to the main walking path up to mountains and during the Summer I anticipate a lot of people walking past. I don’t want to be known as the new bloke who bought the house and now has a scruffy garden!

So lets start with the workshop. Well the good news is that after switching on the light switch the lights came on and whilst I have an electrician coming out soon to provide a new power feed and distribution board out to the workshop I have a temporary set of lights. I also plugged in the extension lead running to the downstairs workshops and the fused spur upstairs via an extension lead provided power downstairs. As I do not know the viability of these items I will only use them if I absolutely have to but its good to know they are there and am looking forward to the new feed being ran in soon.

It looks a bit of a mess but the floor is viable.

The next task was to check out the floor. The survey did highlight this as needing attention and the words actually used were for the whole building was”semi derelict” and an indicative cost of £15,000 was put in the report to sort out a number of issues, these being the roof, the upper floor, the electrics, the lower doors, the upper doors and the lower door lintel.

The weather the last few weeks has allowed me to assess the roof and it is solid, stable, and does not leak but on close inspection from inside a number of batons are broken but the main joists appear to be fine. At some point when I really decide what I am going to use this area for, it will probably be a roof off and full refurbishment but that no longer is on the critical list.

The next main thing to check was the floor. Once again a good inspection from the lower workshops indicates good strong supports with no signs of rotting etc. The next step was to gently walk the upper floor and check for any signs of instabiity. There were a smalll number of places where wider boards were placed on top of a couple of narrow boards and on lifting these it was apparent that whilst not dangerous the original boards did need some attention and the covering board was in place to mitigate this and spread the load. As the upper workshop is not going to be used this year, once again this can be taken off the critical list.

The inside of the upper floor gave signs of its previous use and it was obviously an “old school” workshop as opening a number of the drawers on the benches presented me with a selection of hand tools such as manual drills etc.

One of the benches with lots of items both on the wall and in the drawers.

Another corner of the workshop provided a different surprise in the form of what appears to be a gear box and bell housing. The number plate up on the wall was traced back to a Vauxhall Ventora which appears to be an attempt at a Muscle Car.

At present, the area is just going to be used for storage. Once the bulk of the main house is done and the weather outside is better I can have a better look around but it was good to do an initial assesment.

Please feel free to comment on this article as to how you would use this area. I look forward to reading your thoughts !

So what about the garden?

Well my vision at the moment is to create the garden in three areas as follows:

  • Area 1 – Lower section in front of the triple garage doors have as short cut grass
  • Area 2 – Upper section in front of the single door that open into the workshop have as short cut grass
  • Area 3 – The middle area from the start of the tree and then parallel to the long workshop wall, allow to grow as long grass (meadow like) but within it plant groups of wild flowers to mimic a more natural look. Through the middle cut a single path the width of a lawn mower to allow an easy walk to the upper level
Sorry about my rudimentary art work…

Once again, this is a point where I would love to hear your views. What would you do with this blank canvas??

I’m certainly looking forward to the nice weather kicking in, one of the attractions of this property was the potential in the garden and the workshops and whilst I am sure in the first year I will start to put my stamp on it, this is going to be an evolving and very active part of the blog.